You will find here best resources on rainwater harvesting and purification in my blog and websites. Copyright lies with the respective content creator and writer. I started RainWaterHarvesting Yahoo Forum in June 2003.
Please free to write to me at raincentre at duck dot com.
Contour ploughing is an effective technique for preventing soil erosion. Instead of ploughing in straight lines up and down slopes, farmers plough along the contour lines of the land. This helps to slow down water runoff, reduce soil erosion, and retain moisture in the soil.
Download BMPs on ContourFarming and Strip Cropping
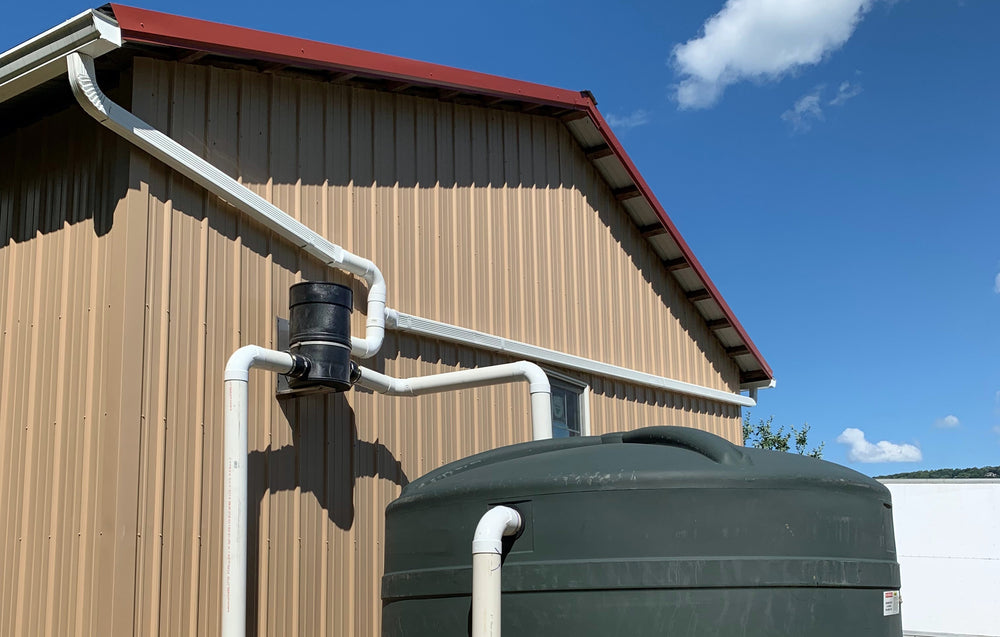
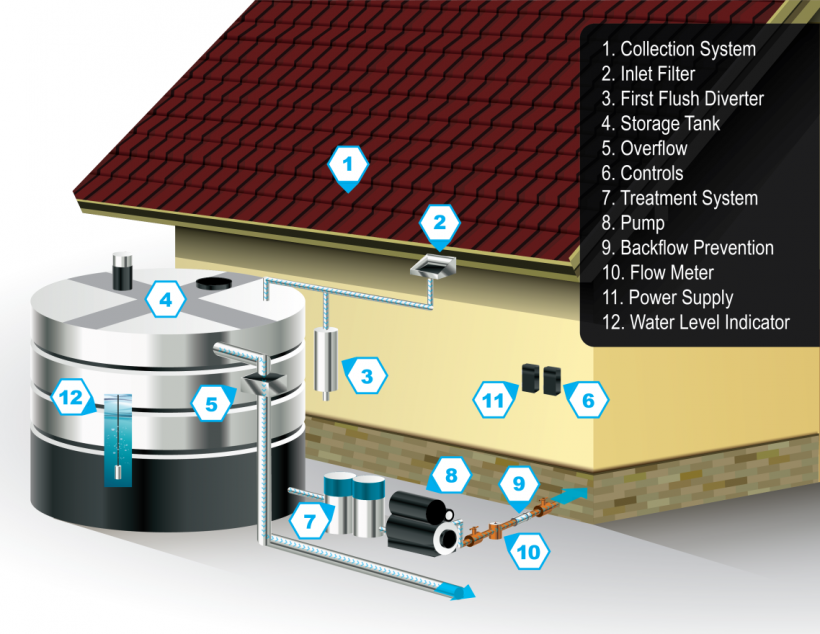
The major components of a rainwater harvesting system
The major components of a rainwater harvesting system
Collection system: Roof surface and gutters to capture the rainwater and send it to the storage system
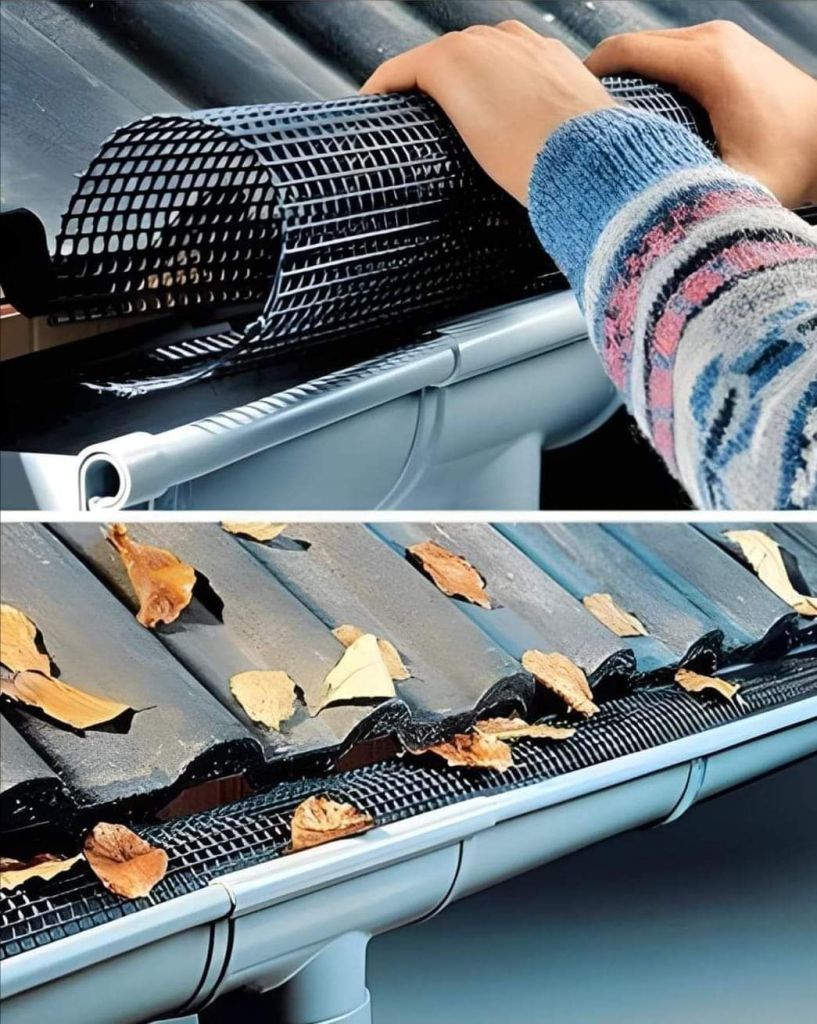
Inlet filter: Screen filter to catch large debris
First flush diverter: Diverter that removes debris not captured by the inlet filter from the initial stream of rainwater
Storage tank: Storage tanks composed of food-grade polyester resin material approved by the U.S. Food and Drug Administration (FDA), which is green in color and helps to reduce bacterial growth
Overflow: Drainage spout that allows for overflow if the storage tank gets full
Controls: Control system that monitors water level and filtration system
Treatment system: Filtration and disinfection system that treats the water to non-potable or potable standards
Pump: Pump to move water through the system to where it will be used
Backflow prevention: Backflow preventer to ensure that under negative pressure water cannot flow backwards through the system into the make-up water system
Flow meter: Flow meter (with data logger) to measure water production
Power supply: Systems may use either conventional power sources or, to improve off-grid capabilities, alternative sources such as stand-alone or grid-tied solar systems
Water level indicator: Monitors the water level in the storage tank.
Mole drainage, on the right soil type and when installed correctly, can help reduce waterlogging problems substantially.
Mole drainage is widely used in New Zealand and the United Kingdom in heavy soils to improve productivity of pastures and crops. Mole drainage was popular with dairy farmers in the 1960s in Victoria but these often failed due to reasons now more fully understood. Recent research has resulted in robust guidelines for installing mole drains so they are more effective for longer, with a greatly reduced failure rate.
What is a mole drain?
Mole drains are unlined channels formed in clay subsoil. They’re formed by pulling a ripper blade (or leg) with a cylindrical foot (or torpedo) attached on the bottom through the subsoil. A plug (or expander) is often used to help compact the channel wall. The foot is usually chisel-pointed and the entire point is hard-faced by welding. More frequent hard-facing of the underside will increase the effective life of the torpedo. The beam is the main rail that carries the leg and torpedo.
Mole drains are used in heavy soils where a clay subsoil near moling depth (400 to 600cm) prevents downward movement of ground water. Mole drains are a more sophisticated drainage system than open drains. Mole drains do not drain groundwater but remove water as it enters from the ground surface.
Mole drains over a collector pipe system
A mole drain over a collector pipe system is recommended in:
soils where mole drains would have a very short lifespan due to sandy or stoney areas
heavy clay type soils, or
lengths greater than about 80 metres to reach an outfall
This system requires the installation of slotted subsurface drainage pipes at approximately 60m to 100m apart, across which mole drains are pulled. This system is useful where soil may contain stones or sandy patches in the profile, at drainage depth, which could collapse when moled. The relatively close spacing of the pipes and shorter mole drain lengths will minimise the area affected by the resultant poor drainage when the mole drain collapses.
Permeable backfill such as washed sand, small screenings or small diameter ‘pea’ gravel is placed (backfilled) on top of the slotted pipe in the base of the trench. The collector pipe will have been installed using a laser to ensure a constant fall in the pipe to the outfall. Depending on the clay content and its depth, this backfill must reach at least 150mm above the moling depth so that the water moves into the backfill via the mole channel.
Mole drains are then installed at an angle (often 70 to 900) to the direction of the pipes. Excess ground water flows into and along the mole drains, then drains into the porous backfill above the pipes, and is then quickly removed to outfalls via the subsurface collector pipes.
Mole Plough
Mole ploughing is a method of deep tillage used in agriculture to break up compacted soil and improve drainage. It involves the use of a machine called a mole plough, which creates a vertical channel or “mole” in the soil by pushing a blade through the earth.
The process of mole ploughing typically involves the following steps:
Preparation: Before starting the mole ploughing process, the field is usually ploughed or disked to remove any surface debris and loosen the topsoil.
Equipment Setup: The mole plough is attached to a tractor and adjusted to the desired depth and angle of operation.
Soil Penetration: The mole plough blade is then lowered into the soil and pulled through the earth by the tractor. As the blade moves through the soil, it creates a vertical channel or mole that can be up to 1m deep.
Soil Fracturing: As the mole plough moves through the soil, it fractures and loosens the soil around the channel, creating pockets of air and allowing for better water penetration and drainage.
Incorporation: Some mole ploughs are equipped with a device that can add organic matter, such as compost or manure, to the channel as it is being created. This helps to improve soil fertility and structure.
Soil Closure: Once the mole plough has created the channel, the soil is allowed to settle and the channel is gradually closed by the surrounding soil.
Mole ploughing is an effective method for improving soil structure and reducing compaction, which can lead to increased crop yields and improved soil health over time. However, it should be used with caution, as excessive deep tillage can also disrupt soil ecosystems and lead to soil erosion.
How to mole plough for optimum benefits. Mole drainage, when completed correctly on the right type of soil type can assist in reducing problems of waterlogging. To help farmers get the most from the process there is a need for farmers to understand how to mole plough and construct effective mole drains.
Wet winter soils are a common problem in parts of the United kingdom and surface drainage has potential to improve the situation by removing excess surface water. For greatest impact the profile of the soil profile needs to be drained so that crops and pastures have the capability to reach their potential and stock damage through compaction and treading can be reduced.
Mole drainage is widely used on heavy soils to improve productivity of pastures and crops in this article we consider How To Mole Plough … Further Reading https://bdolphin.co.uk/news/mole-plough/
Farming equipments – https://claydondrill.com/company-history/ . The Claydon family have farmed the heavy clay lands of Suffolk, in the east of England, since the early 1900s. Jeff and Frank Claydon have been farming since 1970 and are the third generation to do so under the E.T. Claydon & Sons partnership.
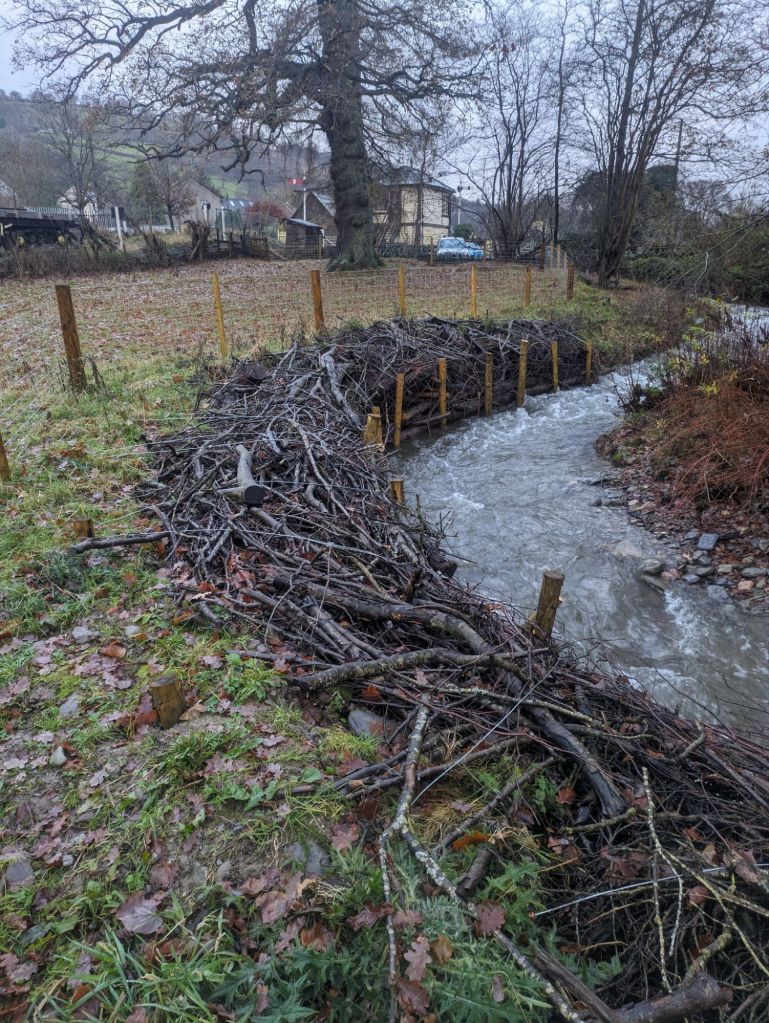
Peter Powell – photo of one of our habitat restoration sites from last week. The brash is pinned in to stop erosion of the bank but will also provide homes for invertebrates and cover for fish. Willow is included, this will sprout into new trees to make the structure alive and permenant.
Water pollution is a growing crisis around the world, but one city in Australia is doing its part to tackle the huge surges of waste that come from stormwater drains. By using a somewhat obvious, simple and cost-effective system of nets, or “trash traps,” the City of Kwinana is… pic.twitter.com/YfGvQ2pSAR
The cost of repairing corrosion worldwide is estimated at $2.5 trillion a year, which is more than 3% of the global GDP—so developing better ways to manage oxidation would be an economic boon.
New research examines #corrosion on atomic level The cost of repairing corrosion worldwide is estimated at $2.5 trillion a year, which is more than 3% of the global GDP – so developing better ways to manage oxidation would be an economic boon.
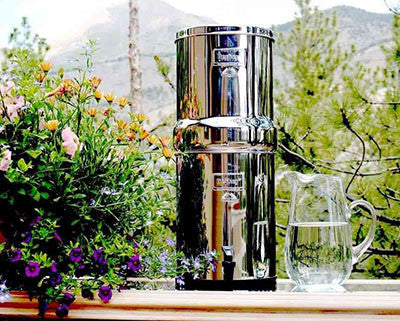
Ceramic water filters (CWF) are an inexpensive and effective type of water filters that rely on the small pore size of ceramic material to filter dirt, debris, bacteria, paramecium, protozoa and other micro organism out of water. This makes them ideal for use in developing countries, emergencies situation , offgrid cabin etc. Berkey Water Filter – The Best Gravity Water Filters https://theberkey.com/ .
TEMBO Water Filter Program – http://msabi.org/tembo-water.html – Together with a local women cooperative, MSABI developed a locally produced and highly efficient ceramic water filter. The filters have been branded TEMBO filters (from the Swahili name Elephant) and an attractive logo and branding material have been developed. The filter is the result of a research and development effort, involving production of several hundred prototypes, collaboration with the international NGO Potters for Peace and testing of microbiological filter efficiency in the laboratory of the Ifakara Health Institute. The filters have an average 99.8% efficiency in removing E.Coli and other bacteria from contaminated water. The product has the capacity to produce an average of 50 liters of clean drinking water per day, sufficient for supplying an entire family with safe drinking water. Filters are sold without subsidy with the intention of establishing a self-reliant, financially sustainable business. The cost of a filter is 40,000 TZS (18.50 USD) with 36 month life expectancy. We currently have the capacity to produce up to 300 filters per month. MSABI acknowledges the importance of a widespread marketing and advertising campaign to promote the uptake and demand for the TEMBO filters. To date we have piloted a number of targeted initiatives including radio broadcasts, village-based distributors, partnering with local health clinics and a micro-finance organization, restaurant display units, and adverts featuring local VIP’s. TEMBO Water Filter: Provide a locally made household water treatment solution through the Upendo Women’s Group. MSABI is one of the largest water, sanitation and hygiene (WASH) non profit organizations in Tanzania. Contact Details: MSABI, P.O. Box 284, Ifakara, Morogoro, Tanzania. Email: info@msabi.org, Tel: +255 688 688 635, Web: www.msabi.org Facebook: @msabi.safe.water Twitter: @msabi_org
Women carry their tembo ceramic water filters home in the remote mofu village of rural tanzania. These filters ar… pic.twitter.com/LzTLc6KiHV
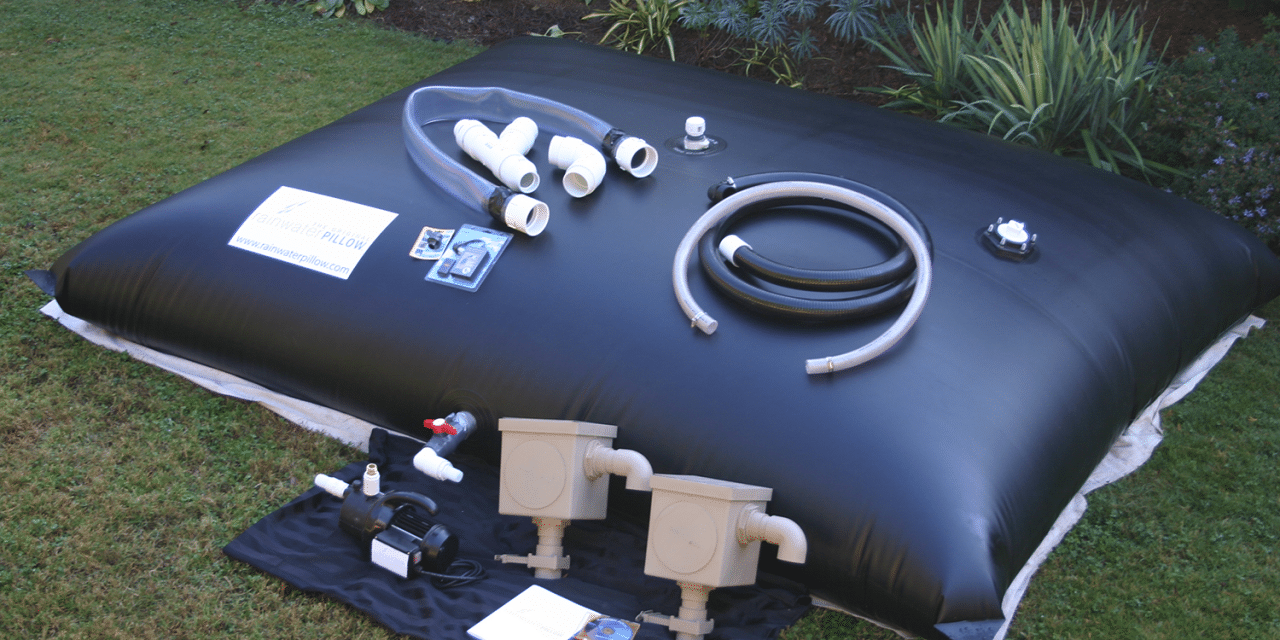
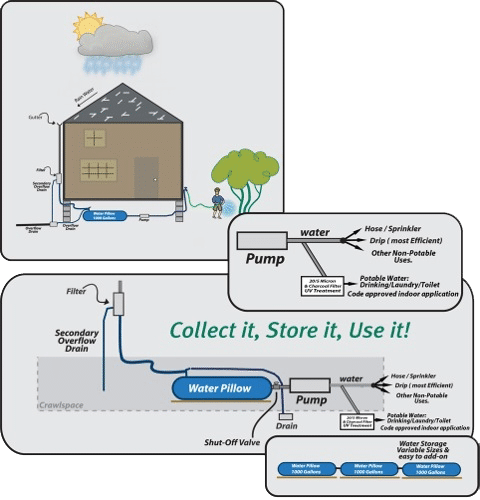
How to install a rain pillow to harvest roof top rainwater.
Rainpillow is a water catchment and storage device for your home in the shape of a goofy pillow.
Why rainwater pillow tanks to collect rainwater – Pillow tanks are flexible storage tank options that can be installed in crawlspaces and under decks to hide them from view. Pillow tanks are often used with inlets that can be connected to downspouts. This allows them to collect water directly from a downspout or gutter system. In general, filling of a rainwater harvesting pillow tank can include gravity flows, pumps, or other options.
Video Instructions – Stepwise instructions shown in the video for rain pillow installation process. DIY installation process has been nicely explained in step by step method in the YouTube video below from https://rainwaterpillow.com/
This Old House landscape contractor Roger Cook installs a rainwater collection system for yard and garden irrigation. (See below for a shopping list and tools. Shopping List for How to Install a Rainwater Collection System: – 650-gallon rainwater pillow kit – heavy-duty plastic tarp – PVC pipe and assorted fittings – PVC primer and cement – anti-siphoning valve – garden hose and lawn sprinkler – bark mulch/ Tools for How to Install a Rainwater Collection System: – push broom – hammer and cold chisel – PVC pipe handsaw – drill/driver – shovel.
Photo Description – Sample photo of rain pillow with complete accessories as provided by the manufacturer Rainwater Collection Solutions, Inc., Atlanta, GA, USA. Picture Source: https://rainwaterpillow.com/
Schematic sketch showing installation of Rain Pillow – Sample sketch as provided by the manufacturer Rainwater Collection Solutions, Inc., Atlanta, GA, USA web-homepage. Picture Source: https://rainwaterpillow.com/
Advantages of rainwater pillow tanks:- – Can be an economical storage solution for water. – Great option for small urban properties if your house has a crawlspace or a space under a deck. – Complete protection from any UV sunlight degradation since the pillow is installed under cover.
Disadvantages of rainwater pillow tanks:- – Tanks can have a very large footprint at the larger volumes due to full height limit of tank. – Inlet filtration is vital for these tanks since they are difficult to clean out. – The pillow tank must be shipped to you.
About Rainwater Pillow – Jim Harrington developed The Original Rainwater Pillow in 2008 as a response to the drought in Georgia. Owner of Jim Harrington Garden Designs, one of the Atlanta Area’s top landscaping companies, he recognized the havoc that a lack of available water could wreak on his customer’s gardens and the potential for rainwater harvesting as a solution.